The Expert Tie Knot: How to Tie a “Christensen”
How To Tie a Necktie with the Christensen Knot
Indeed, most tie knots look quite similar to one another. Typically it is only the size of the knot, and its symmetry that differentiates one from another. But, there is in fact one knot that will stand out in many more ways than simply size and proportion. I am talking about the so-called “Christensen”. It is considered an “experts” knot. It will be perfect if you have been looking for a completely new way to tie, and wear your neckties. When tied with a normal width tie (3 – 3.5 inches in width) the Christensen will stand out because of its larger size, and when tied with a skinny tie (2.25 to 2.75 inches in width) it will stand out because of the cross-patten on the knot. Here are the detailed instructions that will help you master one of the most difficult, and also most unique ways to tie your necktie:
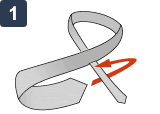 Step #1:
Just like you would with most other tie knots, flip up your collar and lay your necktie around your neck so that the stitching faces towards you. Because the “Christensen” takes much more of the tie’s length, you want to have the wider end hang much further down then when tying other tie knots. My tip: Men taller than 6 foot should consider wearing a longer length tie made for taller men (usually 62-63 inches long). Now wrap the wide end around the narrow end.
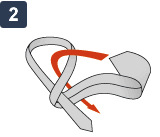 Step #2:
Pull the first wrapping (step 1) tight slightly. Then wrap around the neck opening as show in my illustration on the left.
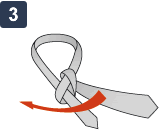 Step #3:
Pull tight slightly and wrap the wide end around the front of the narrow end. Do not pull tight.
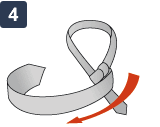 Step #4:
Repeat step #3. This second wrapping makes the Christensen different from all other tie knots. it is also the reason why you need much more of the tie’s length to tie this knot. Once again, do not pull these two wrapping tight yet.
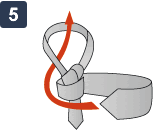 Step #5:
Now that both wrappings are in place it is time to finish the knot. To do so, pull the wide end through the neck opening.
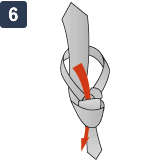 Step #6:
Then take the wide end and pull it through both wrappings you created in step 4 and step 5 above.
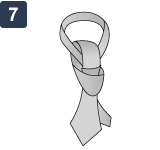 Step #7:
Make sure that both wrappings align. When tying this knot with a skinny tie, the wrappings cross each other (see image 8), and when wearing a normal width tie, the first wrapping will hide behind the second one.
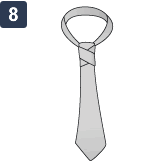 Step #8:
Last but not least, pull the knot tight. You will almost always have a natural dimple when tying this knot (especially when wearing a normal width tie).
Other Fashionable Tie Knots You May Like:
How to Tie a Windsor
Tie a Cavendish Knot
Thanks for Reading.
Hi,I follow this tutorial.Nice, It’s work fine.
Thank you, for this article!