“Manhatten” Tie Knot Instructions
Modern Ways to Tie a Tie: The “Manhattan”
Even though I am a strong believer that the four necktie knots, that are being featured on my home page, are more than sufficient, there are indeed many other knots that have their advantages. Just recently I had featured the Christensen knot – a cross-patterned knot that is perfect for skinny ties. This time around I am teaching you to tie a so-called “Manhattan” knot.
The “Manhattan” is basically a half Windsor that has been tied in reverse – meaning the inner stitching of the tie faces outwards. There are two reasons why you may want to try this knot. First, its wider shape nicely complements rounder face shapes. Second, the wider shape of the knot perfectly suits wide collar spreads – it even works for ties made made from thinner fabrics.
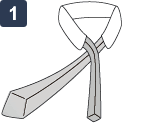 Step 1
Lay the tie around your neck. The stitching should be visible on on both ends of the tie. Then cross the wide end behind the narrow end.(Note: I am assuming you are right handed. All instructions are mirror images, meaning what you see in my illustrations is exactly what you should see when looking in the mirror)
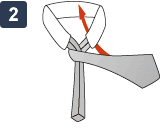 Step 2
Wrap the wide end over the narrow end. The front of the tie should now be visible. Then pull the wide end around the part that is touching your neck (see image).
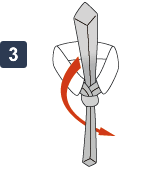 Step 3
Pull the tie around the opposite side. Then wrap around the narrow end that is hanging down in front of your chest. Pull tight slightly.
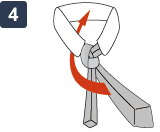 Step 4
In this step you are making the loop in front of the knots which will eventually secure the knot. To do so pull the wide end over the narrow end, and then back in between the tie and your collar. Do not pull tight, but instead create a loop in front of the unfinished knot.
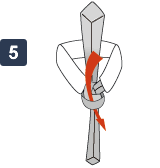 Step 5
Now pull the wide end trough the loop you created in step 4. Give the tie a slight pinch before tightening. This will create a nice dimple.
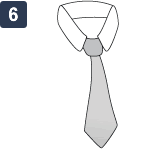 Step 6
Last but not least, give the knot a slight pinch on each side while pulling tight. This will secure the dimple. Turn down your collar and center the knot. And this is already it!
Give this one a try. It will definitely set you apart for all the four in Hands and Windsor knots in your office! As always, I am curious what you think of this knot. Leave a comment below with your feedback.
Hendrik


Thanks for the website, I love trying new knots. That said, I am on your site and was wondering what type of knot is used on the ties in the advertisement on the right side. It’s awesome, but I’m not sure which one it is or how to tie it.
Thank you.
Hi Dan,
Glad you are liking my site. I am quite certain that the knot on these ties is a Pratt knot also known as the Shelby knot. Here is a link to the instructions: http://www.tie-a-tie.net/pratt.html
Thanks,
Hendrik