Blog Archives

Black Tie Dress Code

Black tie refers to a formal evening dress code that typically requires men to be dressed in tuxedo and women in evening gown. Below is a basic guide on men’s black tie attire. It is my goal to make this black tie guide both: concise and simple. Whether you are looking for a quick guide to this formal dress code, or are a black tie regular that is looking for new, creative ways to dress for this strict dress code, my guide will give you all the answers.

The 30 Second Black Tie Guide

what-is-black-tie-attire
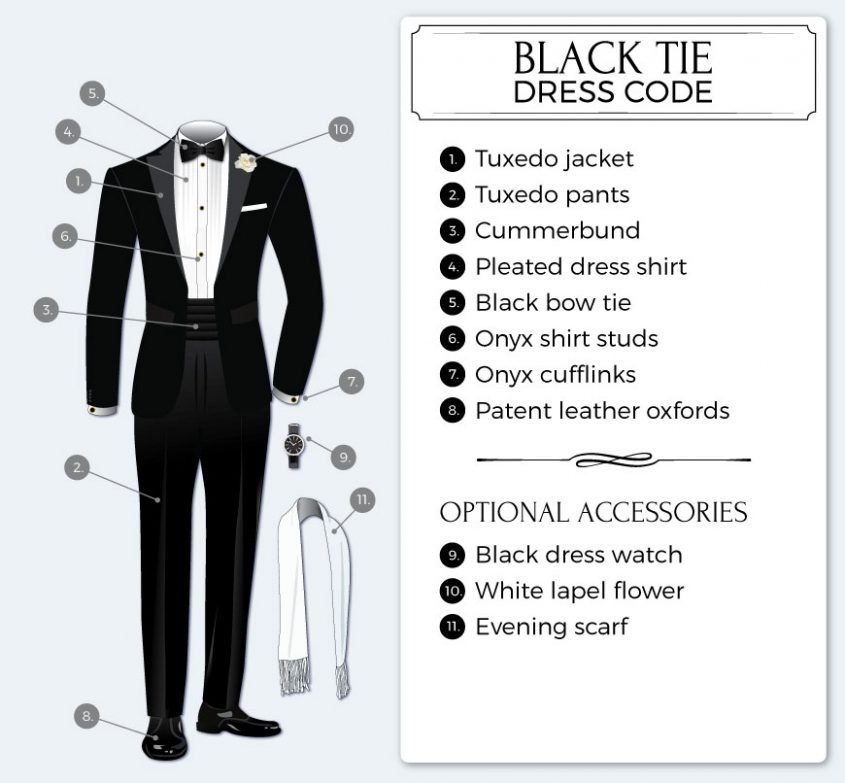
The classic black tie dress code consists of a black tuxedo, white dress shirt, black bow tie, and black dress shoes. These items make up the gold standard of a black tie ensemble. If you are interested to learn more then I discuss each clothing item in much more detail below. I hope you find my black tie guide helpful!

Tuxedos

different-kind-tuxedo-jacket-styles

The Gold Standard

If you want to adhere to the classic black tie dress code then choose the traditional tuxedo pictured above. As you can see from the picture, the classic black tie tux is solid black in color, is single breasted, has one single button, has a peaked satin-faced lapel, does not have vents at the back, and is made from grosgrain fabric. If you don’t want to go with a standard look but still want to stick to the black tie dress code then read on. In the next few paragraphs I will cover acceptable tuxedo color, cut, and fabric options.

Acceptable Tuxedo Colors

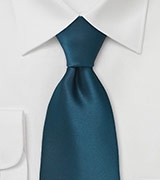
As I had mentioned, black is the classic tuxedo color for black tie functions but a dark midnight blue is an acceptable, and equally suited alternative. Both, black and midnight blue, are acceptable black tie tux colors for evening wear. White dinner jackets worn with black pants are common for day time black tie functions. This type of dress code is commonly referred to “warm weather black tie”.

Tuxedo Cuts & Styles

Besides color there are several designs and cuts available when choosing a tuxedo. First, let’s talk about the cut. Most common is the single breasted tuxedo. The other choice available is a double breasted jacket. The single breasted style is traditional and more classic. The double breasted cut was introduced in the 1930s. While the single breasted tux is typically worn unbuttoned, the double breasted cut should be worn buttoned – making a waist covering unnecessary (see below for waistcoat and cummerbund options). If you want to keep it traditional then choose the single breasted style, if you want something slightly out of the ordinary then the double breasted jacket would be a suited alternative. Keep in mind that the double breasted cut can be slightly less comfortable when sitting down.

Next, let’s talk about lapel styles. Most classic is the peaked lapel. Slightly less common but equally formal is the shawl lapel. Even though notch lapels are more common nowadays they are considered to be slightly less formal. Typically the lapel has a shiny silk facing that matches the facing on the jacket’s buttons.

Tuxedo Fabrics

The classic tuxedo is made from a fabric that has a fine diagonal ribbed texture that is also known as grosgrain. Depending on the quality and price point, tuxedo fabrics range from silk (on the higher end) to a man made polyester (lowest cost). Most common is fine worsted wool. I suggest you choose a natural fiber such as wool. It is more carefree than silk and much more breathable and comfortable than a synthetic fiber. Choose a wool that is labeled “super 100” or higher. The higher the number, the finer, shinier, and more exclusive the fabric.

Rent vs. Buy

black tie functions are a once in a lifetime event for you then I suggest you go with a rental. Renting a complete black tie outfit will range from $60 to $120. Make sure to that you give yourself enough time for fitting and tailoring. Call a rental place ahead of time to see what is available. This can be especially tricky during prom or wedding season.
Buying a tux is a good choice if your body doesn’t change too much anymore, and if you plan on attending more than five black tie functions in your lifetime. The classic black tie outfit will not change and just five black tie events can offset the cost of buying your own ensemble. The cost is one of the factors to consider when choosing buying vs. renting. Other things to consider are design choices, custom tailoring, and quality. Even lower cost tuxedos will be of better quality than a rental. In addition, buying your own tux will allow you to tailor your garment for the perfect fit.

Black Tie Trousers

Classic Tuxedo Pants

Classic trousers are black in color and made from the same fabric as the jacket. The outer seems are hidden and covered by a silk band that matches the jacket’s lapels. Both pleated as well as straight cut trousers are acceptable. Which style you choose is a matter of personal preference and comfort. Tuxedo pants do not have belt loops as they are never worn with a belt. Instead, they are either tightened using adjustable side tabs or suspenders. The waistband of the pants is covered by either waistcoat or cummerbund.

Black Tie Dress Shirts

acceptable-tuxedo-dress-shirts

The Classic Black Tie Shirt

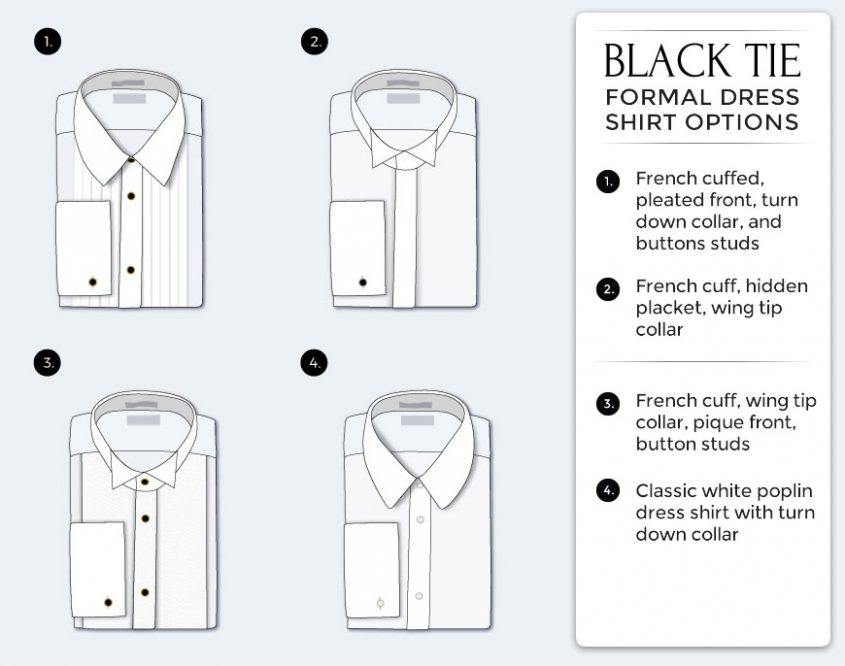
The picture on the left shows a classic shirt that is perfect for your black tie outfit. The classic shirt is bright white in color, has a turn-down spread collar, has a pleated front, and is French cuffed. Below is some more information on different black tie dress shirt options.

Collar Styles

The turn-down collar is the most classic style. Best are wide-spread collars that will hide behind the jacket’s lapels creating a more simplistic and elegant look. Also popular, and actually more formal, is the wing-tip collar dress shirt. The wing-tip collared shirt was typically reserved for the most formal of all dress codes called “White Tie“. This formal dress shirt is now quite common for black tie ensembles. Finally there is the so-called mandarin collar – a shirt that is almost collarless and decorated with black stud rather than bow tie. Please keep in mind that the mandarin collared shirt must only be worn with so called oriental jacket rather than tuxedo. For more information on dress shirt collar styles and how to match them to different types of ties, check out this post.

Pleats or no Pleats

The classic black tie dress shirt has a pleated front that is spaced 1/2 to 3/4 inches apart. If you want to opt for a more simplistic style that does not compromise formality then you may also choose a plain front shirt whose buttons are replaced with black button studs. Regardless of the style you choose, black tie dress shirts never have a breast pocket.

Waistcoat or Cummerbund?

Classic Black Tie Waist Covering

tuxedo-vest-styles
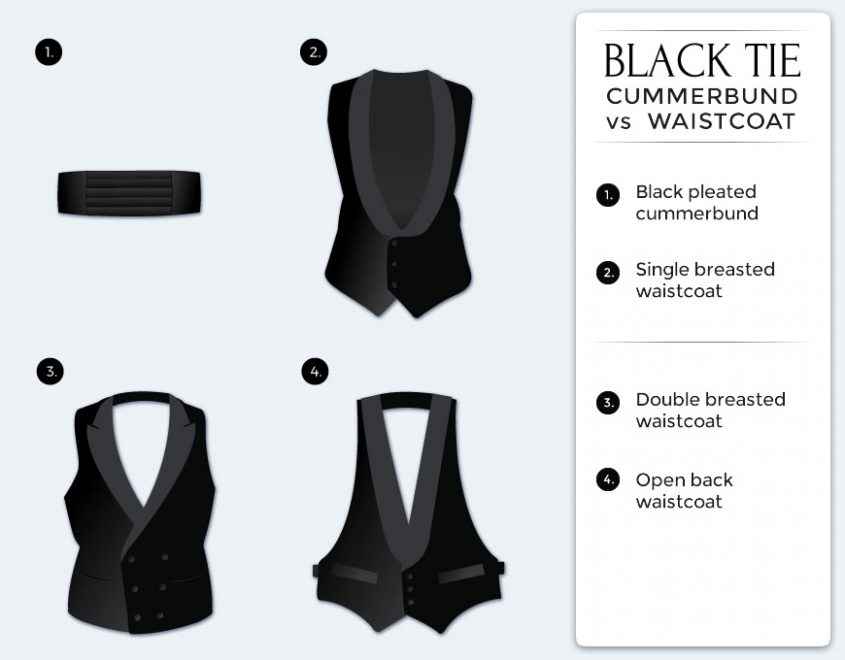
Both, waistcoat as well as cummerbund, are acceptable waist coverings for black tie attire. Even though both are available in a wide range of colors, the classic choice is black – matching the jacket. The black tie aficionado will argue that the waistcoat is better suited for jackets with a peaked lapel while the simple lines of the cummerbund best harmonizes with the clean lines of the shawl collar jacket.

The Waistcoat in Detail

formal-black-tie-waistcoat
faced in shiny sateen silk to match the lapels of the jacket. Most formal are waistcoats with a low cut, showing as much of the shirt’s decorative pleats without hiding the waistcoat. Single as well as double breasted waistcoats are acceptable, and both styles come in full dress as well as open back style (the latter being more comfortable in warm weather). Traditionally the waistcoat has 3- buttons (4-buttons for double breasted) that are faced in sateen silk matching the lapels. Two so-called “welt pockets” are located at the lower front of the waistcoat and were intended to hold a pocket watch and/or ticket stubs.

The Cummerbund in Detail

black-cummerbund
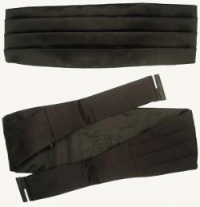
The cummerbund is a decorative sash that originated in India during British colonialism. It was introduced as an acceptable black tie accessory during the 1930s. Traditionally the cummerbund is black in color has upward facing pleats and is made from shiny sateen silk or grosgrain. It is the consensus of black tie experts that the cummerbund is best suited for shawl collar jackets.

Proper Black Tie Neckwear

black-tie-bowties

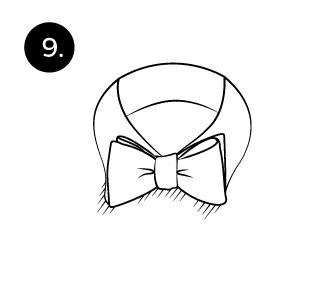
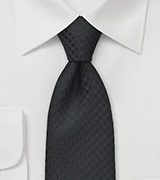
The Classic Black Bow Tie

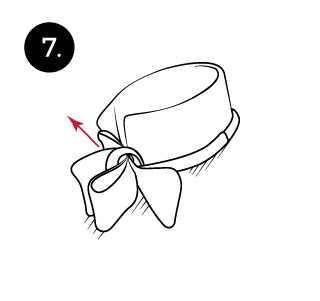
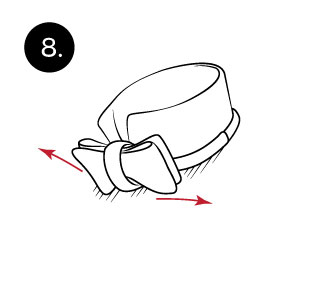
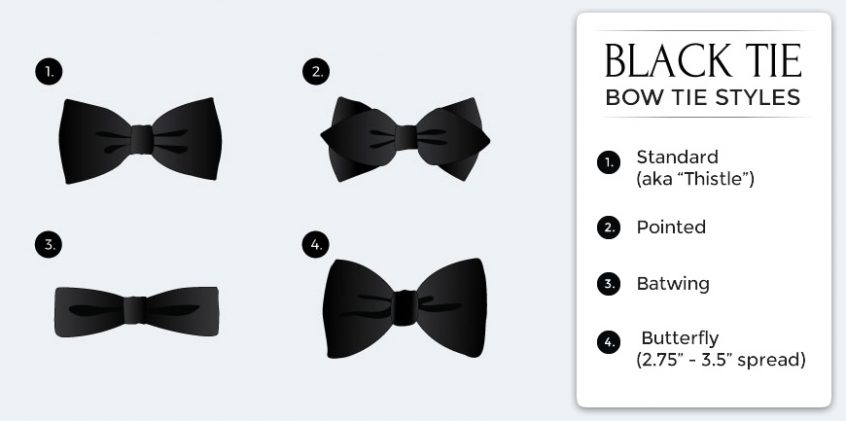
The classic neckwear for a black tie function is a solid black bow tie that is self-tied. The fabric of the bow tie has to match the facing of the lapels. Sateen lapels are matched with sateen silk bow ties and grosgrain faced lapels are paired with finely ribbed or pique fabric bow ties.

Other Bow Tie Styles

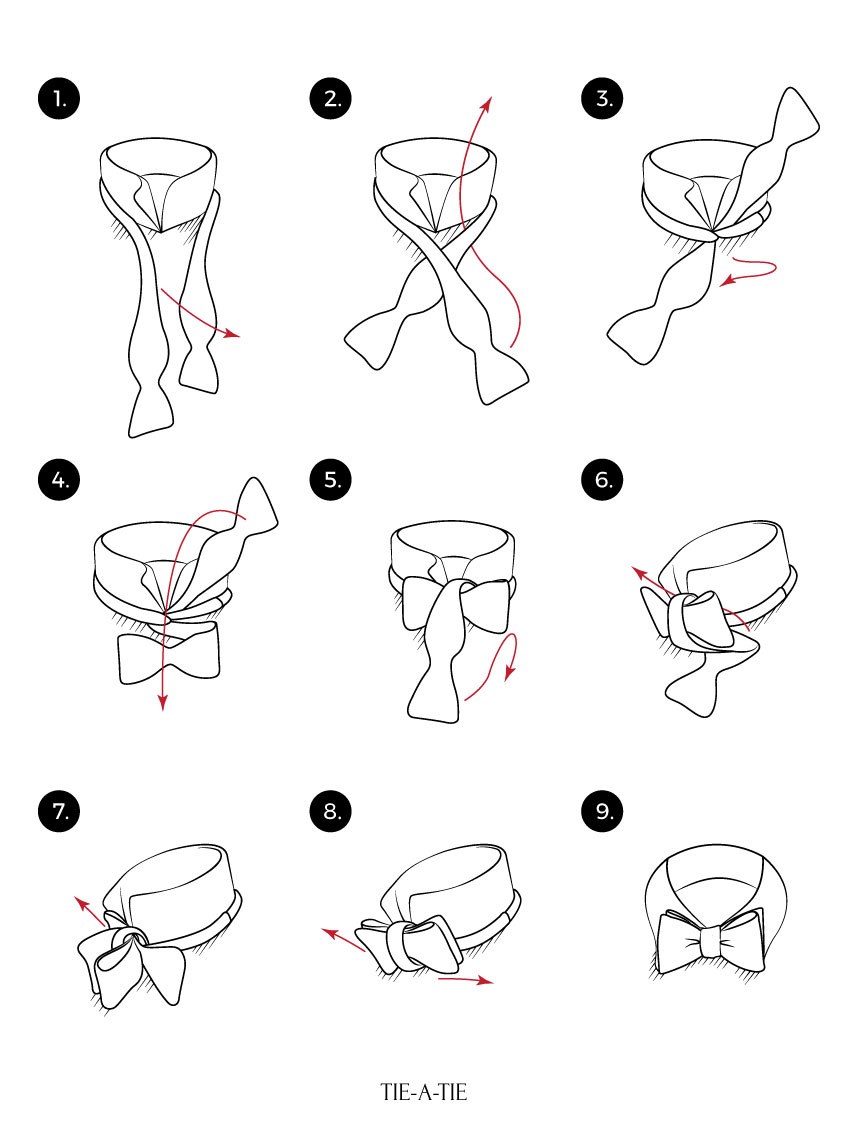
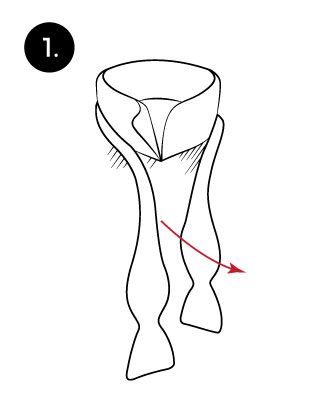
The classic bow tie is a so-called butterfly bow tie. It has a spread of 2-2.5″. Also acceptable are narrow bow ties, called batwing, whose spread is 1-1.5 inches. Finally there are bow ties with pointed tips – a great alternative for those seeking a slightly different and more unique look. When shopping for a black tie bow tie you can choose between a pre-tied and a self-tied bowtie. Pre-tied bows are acceptable for proms but are considered a black tie Faux Pas once you graduated high school. When buying a self-tied bow tie you can choose between a fixed length and an adjustable length bow. I recommend the fixed length bows that are typically available in Small (13.5 – 15 inch neck), Medium (15.5 – 17 inch neck), and Large Size (17.5 – 19.5 inch neck). The fixed length bow offers two advantages: First, the size of the bow will automatically be proportionate to your neck and face. Second, the lack of the adjustment clasp gives the bow tie much cleaner and formal look. If you need to learn to tie a bow then I suggest you view my guide on How to Tie a Bow Tie

Shoes for Black Tie Attire

dress-shoes-for-black-tie-attire

Classic Black Tie Footwear

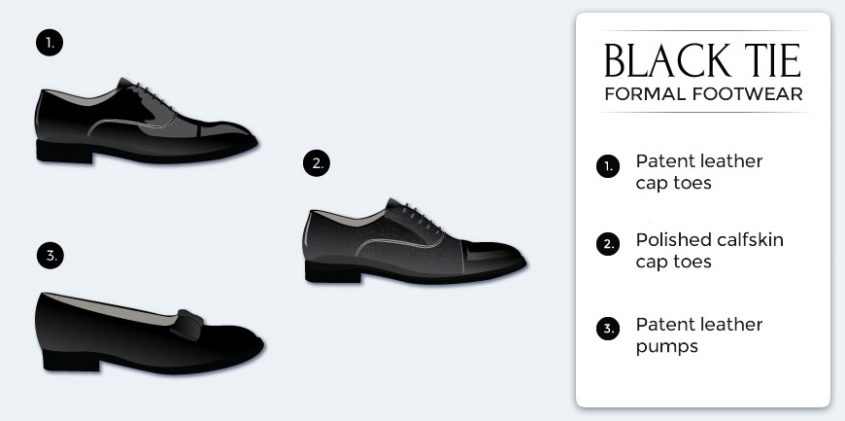
Black tie footwear is slim, minimal in decorations, and lightweight. Two styles are common for black tie attire: The formal pump, as well as formal lace-up (oxford). The pump is always made from high gloss patent leather while the formal lace-up (pictured) is also acceptable in polished calfskin.

Optional Black Tie Accessories

Opera Scarf

The opera scarf is a common evening accessory that is white in color, has 3-5 inch long tassels, and is either made from finest silk or cashmere. The opera scarf is never tied but instead worn loosely over the shoulders. Traditionally men wore the opera scarf so that they could offer it to their date to stay warm during the opera’s intermission.

Cufflinks & Studs

Cufflinks and studs are a must have accessory for black tie attire. The cufflinks have to match the decorative shirt button studs. Cufflinks and studs are usually made from gold, silver, platinum, onyx, or mother of pearl. The metal color has to match your wrist or pocket watch.
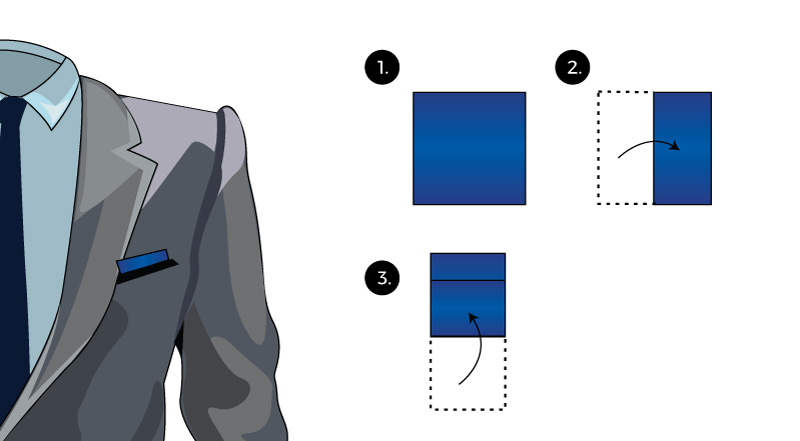
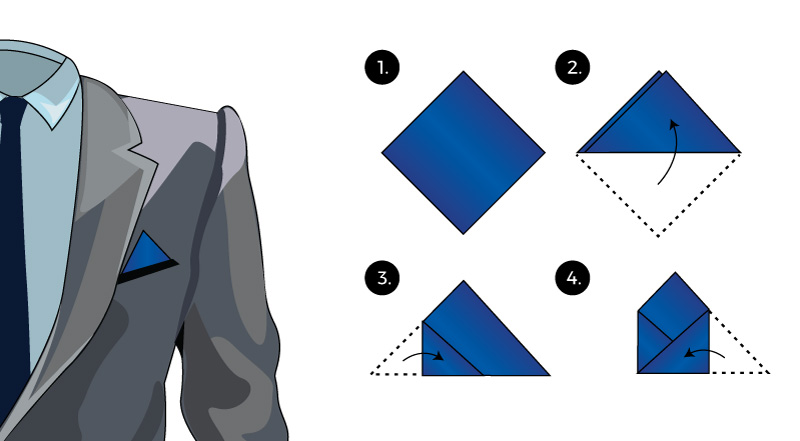
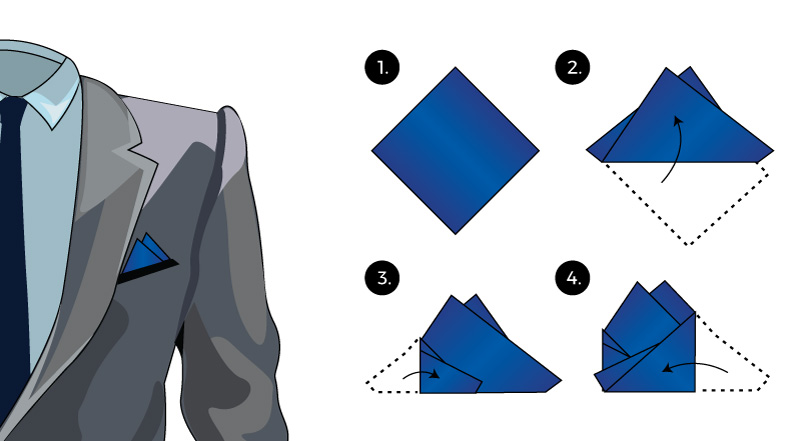
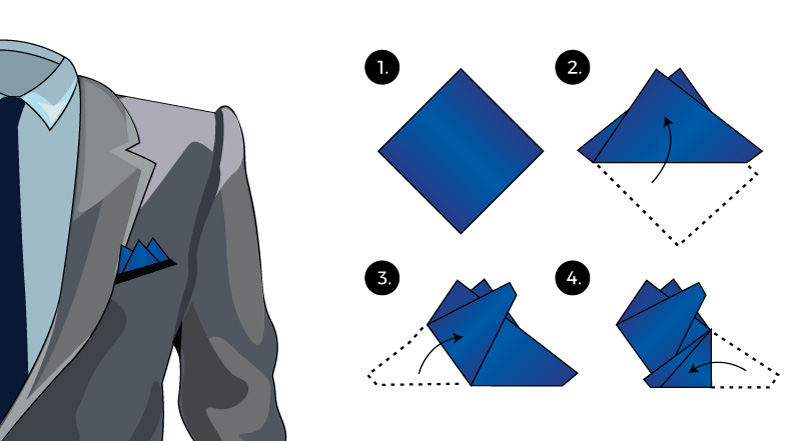
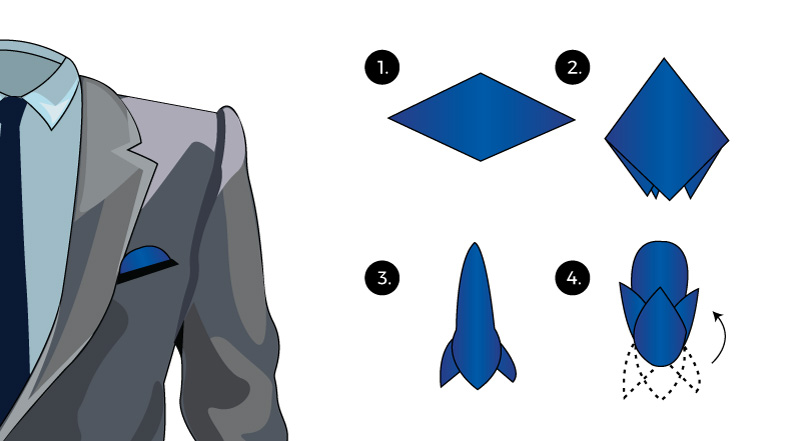
Pocket Squares

Another optional black tie accessory is a white pocket square. The type of pocket square fold you choose is personal preference. Formal pocket squares are either made from fine linen, cotton pique, or silk. Best are pocket squares with hand-rolled edges. I am currently compiling a guide with different ways to fold a pocket square. I will let you know as soon as it is finished.

Dress Watch

Some black tie experts will argue that a wrist watch does not belong to a black tie outfit. They argue that “clock watching” does not pair with the celebratory nature of a black tie event. If you do choose a wrist watch, then keep the design simple, sleek, and unadorned. A model with classic black leather band and a thin body is best suited. Another great option is a pocket watch. When choosing a watch make sure that the metal matches the color of your cufflinks and button studs.

Strictly “Black Tie” VS “Black Tie Optional”

On a final note, I wanted to address a common question that I continually have been getting asked over the years: What is the difference between an invitation that reads “black tie” vs “black tie preferred” vs “black tie optional”. To keep things simple, my black tie dress guide above will work for any of these. “Black tie preferred” basically means you should dress in a tux and bow tie, but the host wants to give you some leeway. If you don’t own a tux, then a black suit and black bow tie or black necktie would be acceptable. “Black tie optional” gives even more flexibility. Feel free to wear your fancy tux if you like, but a full suit is also just fine. For more information on creative ways to dress for a black tie “preferred” or “optional” event, check out these 10 sample outfits that our friends over at Bows-N-Ties have created HERE

Necktie Accessories

By the time your necktie collection is growing and when you are wearing ties on a more regular basis, you may want to think about getting yourself a necktie accessory to hold your tie in place at all times and prevent it from getting in your way when you eat, work or play.

Basically, there are five kinds of necktie accessories – tie bars, tie clips, tie tacks, tie chains and tie straps – made of different types of metals, including gold and silver, or plastics.

Tie Bar

barThe tie bar – also known as a tie slide – is a thin piece of metal that you slide across the middle part of your tie in order to attach your tie to your dress shirt.

As you can see on the left, tie bars come in all sorts of different shapes: There are the plain ones such as the first tie bar at the top, some oddly shaped ones such as the second one or even some really creative ones such as the fountain pen tie bar at the bottom.

Tie Clip

clipThe tie clip – also known as a tie clasp – is very similar in use to the tie bar. Instead of sliding it across, though, you would clip it horizontally across your tie, thus attaching it to the dress shirt you are wearing.

Again, you have many different choices in regard to the shape, the length or the material that the tie clip is made of. Remember that the material you choose makes a great difference to the overall appearance of the tie clip.

Tie Tack

tackThe tie tack is very different in form and function from both the tie bar and the tie clip.

As you can see on the picture on the left, a complete tie tack is made up of two different parts: The decorative part, the pin, on the left and the back, or base, with a chain attached to it on the right.

To don a tie tack, you have to remove the pin from its base, then pierce through the silk cloth of your tie, connect the base to the pin again and then slip the metal weight and chain through one of the button holes of your dress shirt.

Tie tacks, or rather their pins, come in many different forms, too. Instead of a colored stone up front, I have seen some more creative ones with police badges, flags or company logos.

Due to the permanent damage a tie tack does to your ties, I would like to caution its use, though.

Tie Chain

chainThe tie chain is yet another tie restraining device to ensure that your tie remains in place at all times.

The fixed upper part of the tie chain, the bar, is hooked to one of the buttons of your dress shirt and then the tie is put through the chain’s loop in such a fashion that the bar is hidden behind the tie and the chain is visible in the front.

Most tie chains are made of gold or silver and most often do not differ much in form or shape from the example shown on the left.

Tie Strap

strapThe tie strap is a restraining device that was introduced relatively recently. It keeps your tie in place without restricting its vertical movement.

The tie strap works by slipping it through the label loop on the back of your tie and then by buttoning it onto your shirt buttons above and below the label loop.

Unlike the other tie accessories, this one is most often made from either cloth or transparent plastics, making it virtually invisible in the latter case.

Even though whatever type of necktie accessory you choose is eventually up to you, I would recommend using a tie bar or a tie strap. Why? Partly because they really do a wonderful job at holding your tie in place at all times but also because they do not do the kind of damage that a tie clip could possibly and a tie tack will definitely do to your tie. Moreover, a tie bar or a tie strap is also much lighter in weight than any tie chain I have come across.

Check out Giftwagon’s great offers on necktie accessories if you are thinking about buying a tie bar, tie clip, tie tack or tie chain. Or pay a visit to Tie Align if you are interested in getting yourself a tie strap!

Buy Neckties Online

During the time you are practicing the tie knots I explain here on my website, one or two neckties of your choice will certainly be all you need to start with.

But once you get into the habit of tying, wearing and yes, even liking ties, you will probably want to expand your collection and go for a little more variety.

Having run into that same “problem”, I wanted to give you a few tips from my own experience as to where to go to get some really good deals on neckties.

tntTies-Necktie.com brings you exclusive European fashion to the U.S. and that at very affordable prices. The site features over a thousand elegant mens ties, as well as bow ties, cufflinks, and pocket squares! If you are interested in fashion and style then you may also want to check out their fashion encyclopedia and/or their mens fashion blog.

bntAnother great retailer is Bows-n-Ties.com. This online tie specialist carries several exclusive European tie brands and besides neckties offers a good selection of bow ties, handkerchiefs, cufflinks, and men’s silk scarves. The company also offers seasonal sales that often times will save you an additional 20-30%.

Oh well, don’t you just love shopping on-line from the comfort of your own home and then after only a few days having all those beautiful ties delivered right there to your doorstep? No hassles, no driving into town, no traffic jams, whatever the weather is like — I absolutely love it!

Extra-Long Ties Calculator

When you feel that your tie comes out just too short after you have tied your necktie’s knot, it might be that you are using regular length ties when extra-long ties might be a better choice.

The difference between a regular tie and an extra-long one is three to four inches. Regular-length ties are normally 58/59 inches, whereas extra-long ones are usually 61/62 inches long.

As a rule of thumb, take your height in inches, and add your necksize in inches to it. If the number exceeds 91 inches you are better off with XL neckties. To help you make the choice, use my tie length calculator below:

Your body height
feet   inches
Your collar size
inches

You might find to be the best fit


Necktie Length

As a general rule for all tie knots, the widest part of your tie should hang roughly at the same height as the upper edge of your leather belt, with the tie’s tip extending slightly below it. The tip of the narrow end would then hang wherever it may.

If you run into problems trying to get the length right with either the Windsor Knot or the Half Windsor Knot, try to let the wide end hang down as far as possible in step 1 of the instructions for these knots, so that when you cross the wide end over the narrow end, you can barely hold on to the narrow end. That will give you more length once you have eventually tied the knot.

However, it might also be the case that you are using regular length ties when extra-long ties might be a better choice. Use my extra-long ties calculator to see whether regular-length or extra-long ties would be the best fit for you.


[associated_posts]

Tie Tips & Tricks

After getting into the habit of wearing ties on a more regular basis, you will probably notice that they somehow seem to “wear off” a little bit. That may be due to improper care or things beyond your reach, for example, getting food or beverages spilled on your favorite tie.

That is why I wanted to give you a few suggestions as to how to take care of your tie to make sure that you will be able to wear and preserve it for quite some time to come!

How to Properly Untie Your Tie

A very common mistake a beginner makes when learning how to tie a tie is that once you get that first knot done right, you would never even think about untying your tie at the end of the day. Instead, you would probably prefer to make the loop just big enough to pull your head out and hang the tied tie on a clothes hanger or over the back of a chair.

Unfortunately, that is the most damaging thing you could ever do to your tie. What you would rather want to do is to properly untie your tie.

However, this is where half the nation – yes, beginners and folks who have worn ties for quite some time alike – commit the second gravest sin when it comes to untying any tie. That is to just rip it off by the time you get home.

Paying a little attention is key here, though, as doing the opposite will definitely ruin your tie – rather sooner than later.

Instead of hastily tearing and yanking a tie from your neck, repeat all of the steps you followed to tie your tie but now do so in reverse order! Step #7 becomes #1, step #6 becomes #2 and so on…

While this process might not necessarily save you an extra minute each evening, it will definitely save you your precious tie and your hard-money that you would have to spend on new ties every couple of weeks.

Remember that as with all things precious, it is going the extra mile to make it last, to keep it coming, to keep happening!

“Instead of hastily tearing and yanking to remove your tie from your neck, take the time to repeat all of the steps you followed to tie your tie but now do so in reverse order!”
How to Quickly Get Rid Of Tie Wrinkles

After untying your tie, especially when your tie is made of thick and heavy silk, you will probably notice that there are wrinkles that make it look very worn and used – even though you have only worn that tie for only a couple of hours.

However, there is something you can do to get rid of that problem overnight. Basically, all you do is to wrap the tie around your hand, then put it onto a table or into a drawer and let it rest for a while.

To help you understand I took some pictures with a digital camera. Here is what you would do:

wrinkles

1) Hold the narrow end of your tie with your thumb as shown on the picture above, while letting the wide end hang down to the floor.

2) Wrap the wide end around your hand several times.

3) Take the wrapped-up tie and place it on a flat surface.

You will see that after only a few hours all of the wrinkles will be gone and your tie looks as fresh and new as if you had just purchased it at a store!

By the way, wrapping up your ties is also great while on travel to prevent the ties from being damaged in a tightly-packed suitcase.

To quickly get rid of tie wrinkles, hold the narrow end of your tie with your thumb, wrap the wide end around your hand and then place the wrapped-up tie on a flat surface for a couple of hours!”
How to Treat Tie Stains

One of the moments every tie-wearing guy worries about is to get food or beverages spilled on your favorite tie.

That is because chances are 9 out of 10 that that stain permanently ruins your tie as the majority of ties is made of silk, a very unforgiving type of cloth when it comes into contact with coffee, Coke or ketchup!

As silk is a very delicate material, applying stain-removers will only make matters worse. The only thing that I recommend you do is to take your stained tie to your local dry cleaner and ask them for help.

While dry-cleaning will remove the stain in most every case, there is one major downside to it: The shiny look and feel of your tie will be gone, too!

Therefore, really make every effort to protect your tie during meals, e.g., by covering it using a large napkin or removing it if appropriate.

Never treat tie stains with stain-remover! Instead, take the stained tie to your local dry cleaner and let them see to the problem. Keep in mind, though, that while dry-cleaning removes the stain it will also destroy your tie’s shiny look and feel.

How to Fold a Pocket Squares

Welcome to my pocket square folding guide where I am showing you the 5 most basic and classic ways to wear your pocket squares. For those of you who are looking for more eccentric folds, also check out my 50 ways to fold a pocket square feature on my blog. If you haven’t tried accessorizing your suit, shirt, and tie with a pocket square then the seven reasons below should be convincing enough to give it a try:

  1. A pocket square adds nice color and more live to suit, shirt, and tie.
  2. The pocket square is a perfect complement to your necktie.
  3. A pocket square instantly adds a touch of sophistication and elegance to your ensemble.
  4. Using a pocket square allows you to “dress up” or “dress down” an outfit.
  5. Best “bang for buck” accessory! – The pocket square earns you lots of style points for little money.
  6. Expand your wardrobe – Wearing a pocket square gives the same suit a different look each day.
  7. Last but not least, a pocket square allows you to add more personal style to an otherwise uniform looking outfit.

Fold #1 – Classic, Sleek, & Elegant

This fold, also called “Presidential Fold”, is one of the easiest ways to fold a pocket square. This fold is best for elegant attire ranging from formal business dress to black tie. Typically a classic white pocket square made from silk or linen is used for this fold.

fold a pocket square
Instructions:

  1. Lay the pocket square on a flat and clean surface.
  2. Fold the pocket square in half.
  3. Fold one side up. How much of the pocket square you fold in is depending on how deep your jacket’s pocket is.
  4. Tug the folded pocket square into your breast pocket so that about 1/4 of an inch is visible.

Fold #2 – One Tip Up

Another popular way to fold the pocket square is the triangular “one tip up” fold. It suits any type of pocket square and dress code. Personally, I like this fold with a solid colored, non-white, pocket square.

classic pocket square fold
Instructions:

  1. Start out by laying the pocket square on a flat surface.
  2. Fold one corner in so that you get two overlapping triangles.
  3. Fold one side of the triangle in.
  4. Do the same on the opposite side.
  5. Finally place the pocket square in your jacket’s pocket.

Fold #3 – Unique & Sophisticated

Looking for a somewhat different pocket square fold? Then this fold, sometimes also called “two tips up” fold might be perfect. It suits any pocket square color & pattern. Personally I choose this fold for patterned pocket squares accessorizing a casual-sleek outfit that is rather sophisticated than formal.

how to pocket square
Instructions:

  1. Place your pocket square on a clean & flat surface.
  2. Fold one side over so that you get two triangles that overlap. I prefer the look of having one tip higher than the other (see illustration above).
  3. Now fold one side in.
  4. Do the same on the opposite side.
  5. Place your folded pocket square in your breast pocket and you are already done.

Fold #4 – The Pocket Square Aficionado’s Fold

This type of fold that is sometimes also called “three tips up” or “crown fold” is perfect for patterned and colored pocket squares. Although this fold would suit formal attire, I like it most with when paired with blazer jacket or sports coat.

pocket square folding
Instructions:

  1. Lay your pocket square on a flat surface.
  2. Fold one side in so that you have the look of two triangles – creating two tips.
  3. To create the third tip, fold in one side as shown in picture #3 above.
  4. This step creates the base which will keep the pocket square in place. Fold in the opposite side and make sure to create a strong fold with the palm of your hand.
  5. Place the folded pocket square into your pocket and you are done.

Fold #5 – The Casual Fold

This type of fold, sometimes also called “Puff fold”, is ideal for a more casual-sleek outfit. It looks best when used for patterned pocket squares. I particularly choose this fold for pocket squares that have unique paisley patterns, tartan checks, and polka dots. This fold is less suited for formal attire.

casual pocket square folding
Instructions:

  1. Place the pocket square down flat.
  2. Now pick up the pocket square by pinching it near the center.
  3. Slide the hanky trough your other hand as shown in picture #3.
  4. Now flip the pocket square upside down.
  5. Finally tug the pocket square in your breast pocket. Don’t over-think this fold, the fold should look casual and a bit uneven.

Bow Tie Knot

Did you know that less than 1% of adult men actually know how to tie their own bow ties? While pre-tied bow ties do exists, set yourself apart by learning how to tie your own. In theory it is quite similar to tying your shoes. To learn this gentlemanly skill, I put together these simple 9-step instructions.
learn how to tie your own bow ties

Tie a Bow Tie Video Instructions

Bow Tie Knot Step by Step Instructions

The Bow Tie Knot is used to tie a bow tie and is worn to give you a formal and elegant appearance. A “black tie occasion”, where the bow tie is worn with a tuxedo, or a wedding are two typical events that are perfect for wearing a bow tie. To tie the Bow Tie Knot, select a bow tie of your choice and stand in front of a mirror. Then simply follow the steps below:

Bow Tie Knot


Pull up your collar and lay the bow tie around your neck. One side should hang 4-5 inches lower than the other. Then cross the longer end over the shorter end.

Bow Tie How to


Create a half knot just like you do when tying your shoe laces.

Tie a Bow Tie


Keep a finger on the half knot to keep it tight. Then fold the shorter end of the bow tie in half. It should start to look like a bow tie.

Learn to tie a bow tie


Take the longer end of the bow tie and pull it over the half folded bow tie.

How to tie a mens bow tie


Now half fold the unfolded part of the bow tie.

bow tie knot instructions


Just like you do when tying your shoes, pull the bow tie through the loop at the back of the bow. Do so by pushing and pulling along the fold.

bow tie tutorial how to


Pull/push only half way through.

instructions for tying a bow tie


Pull on both sides of the bow and pull tight. As a little trick, put your index fingers through each of the loops and pull outwards.

self tied bow tie how to tie


Tug and pull to make sure the bow tie sits tight. Then center in between your collar and voila, your just tied your own bow tie! Congratulations!

And that is how it is done! Simply keep practicing the Bow Tie Knot a few more times now to let your new knowledge sink in.

Sitemap

Here is the sitemap of the Tie-a-Tie.net website to help you navigate more easily.

Home
The startpage with an introduction as to what Tie-a-Tie.net is all about.

Four in Hand Knot
A detailed and illustrated description to help you tie the Four in Hand Knot.

Half Windsor Knot
A detailed and illustrated description to help you tie the Half Windsor Knot.

Windsor Knot
A detailed and illustrated description to help you tie the Windsor Knot.

Pratt Knot
A detailed and illustrated description to help you tie the Pratt Knot.

Bow Tie Knot
A detailed and illustrated description to help you tie the Bow Tie Knot.

Tie Knot Video
A video for learning how to tie a tie, using the Windsor, Half Windsor, Four in Hand and Pratt tie knots.

Tie Tips & Tricks
Interesting tips and tricks on how to properly untie a tie, how to quickly get rid off tie wrinkles and how to treat tie stains.

Necktie Length
Guidance on correct tie length, and diffrence between regular-length and extra-long neckties.

Extra-Long Ties Calculator
Calculator to determine whether to wear regular-lentgth or extra-long neckties.

Necktie Accessories
An in-depth look at the most important necktie accessories for tie wearers.

Job Interview Dress
An outline detailing how to dress for a job interview.

Buy Neckties Online
A list of quality sources and trusted online shops to buy neckties on-line.

Link to Me
Detailed link instructions for every webmaster who wants to support this website by placing a short and simple link to Tie-a-Tie.net

Message
A form to send in your feedback and suggestions to Tie-a-Tie.net

Sitemap
The page you are currently looking at!

Privacy Policy
The Privacy Policy of Tie-a-Tie.net

Message


I encourage you to use the form below to send in feedback or any questions or suggestions you may have about Tie-a-Tie.net!

Let me hear your opinion on this website, how it helped you in particular or what I could do to improve it and ease your learning process of how to tie a tie. Thanks.